It’s more than just a trend. By now everyone has seen the importance of taking monthly baby photos as they drastically change throughout their first year. I’ve had both personal experience and professional with making sure those babies get the photos necessary. Personally, I took monthly photos of all three of my babies and of course put them all in a sweet little collage side by side. Professionally, I have documented the growth of many babies over the years with my popular Baby’s First Year Packages. Let me just share 4 tips that might help you take better monthly baby photos (even with your phone).

Tip #1: Look for the best light.
The best light can be found under many different circumstances. I would venture to guess that most of you don’t have studio lighting just lying around. We are bound to the limits of what natural light we have. So for this blog, let’s just stick to where you’ll find the best natural light.
- Indoors: The best place indoors to find natural light is by your biggest windows, or even by an open door. If you’re shooting indoors, it’s best to shoot when a lot of light is shining inside your home. So, let’s say for instance your home’s living room has eastward facing windows (where the sun rises). In that case, it would be best to get the bright late morning light through those windows. The same goes for a westward-facing room. You would look for the mid to late afternoon hours. These times are when the sun is high and shining brightly through your windows. Did I lose most of you at east and west facing? Ha. Stick with me. Now the biggest thing with indoor natural light is to make sure you’re not ALSO using artificial light. This means you would need to turn off all (and I mean ALL) bulbs in the room you are in and even surrounding rooms. Trust me on this, the competing light sources are not a good look.
- Outdoors: If you’re shooting outdoors then you want to wait until the light is the most flattering. Most often this is the first thing after sunrise and within a few hours of sunset are when you will get the softest and most flattering light. You can cheat these rules a little bit more if you have a decent amount of shade to hide in. Things like the shadow of your home, large trees, or a nice covered porch.
- Now as for artificial light. Yes, I’m looking at you with ring lights. You can absolutely use those. It’s just my personal opinion that natural light much easier to create softer, prettier, and more appealing, that doesn’t create the obvious white ring in the reflection of the eyes. I have a different soap box for this later…
Tip #2: Overshoot
“Shoot first, ask questions later.” Okay, but really…take as many shots back to back as you feel necessary. The iPhone photo blast feature is just the right tool to accomplish this. You can even use the live photo option and retroactively select the best image from there.
But why? I’m sure I don’t have to inform you that those baby expressions are frequent and fleeting. Taking many photos back to back will help you capture as many of them as you want. It gives you the most options and variety of expressions you could ever hope for. You can get anything from a happy face, a dead stare, open mouth giggles, or even some of my favorites the frowny faces. All different facets of your baby that will tell the story of their personality.
One thing I’ve found helpful to bring out the desired expressions is to get your phone ready to go. Then as you’re holding your phone look past the screen straight into your baby’s eyes and talk to them as if you’re not taking photos. They will just light up and give you the best smiles.

Tip # 3: Keep it simple
Another key to making beautiful monthly baby photos is to keep it simple makes one rather large difference. For moms (who have the limited brain capacity for extra things) keeping these photos simple will help you not to cast them to the wayside.
Here are some really easy ways to keep it simple:
- Laying the baby on the floor. Literally, baby…on a blanket…on the floor. It doesn’t get much more simple than that. The only tricky thing with this is that as the baby ages and becomes more mobile they will want to roll, scoot, and crawl away.
- Laying in the crib. This may require a step stool of some kind, but it is similar to the option mentioned above with one detail switched. They are trapped. Ha. But seriously, in the crib, they cannot get away. Plus, you still have that simple look of the baby laying on their back.
- Nursery rocking chair. Most nurseries have a rocker of some kind. These are great for many reasons. Often they are close to a window. Yay light. They are soft for those unstable sitters. And last, the arms of the chair serve as a good way to prop babies up with a simple prop.
- For my photos of my babies, I held them right in front of me. It’s hard to explain exactly how this worked, so keep reading and you’ll get to see how it plays out.
Whatever you do, just make sure that it’s something simple. That way the next month rolls around you aren’t overwhelmed at how ambitious you may have been with the setup the month before.
Tip #4: Be Consistent
The last tip goes hand in hand with keeping it simple. If you do the work of keeping it simple, then it will be infinitely easier to be consistent. Being consistent is the best way to document development. If you’re consistent, then you can really see how the only thing changing in the photo is the baby. All the distractions disappear and you can really compare your 2-month baby to your 10-month baby. It will really showcase how much your chunk has grown. Some things to consider in trying to maintain consistency are using the same place, the same setup, the same time of day (for lighting purposes), or even similar outfits if possible.
BONUS: How I captured my monthly baby photos
For the first 5-7 months of your baby photos, chances are they are laying on their back. One huge tip for cute and flattering baby photos is to avoid shooting up the nose. It’s not the cutest look. An easy way to avoid this is to move close toward your baby’s head and then angle your camera slightly downward toward their feet. The tip of the baby’s nose is a heck of a lot cuter than the nostrils that look like they take up half of their face.
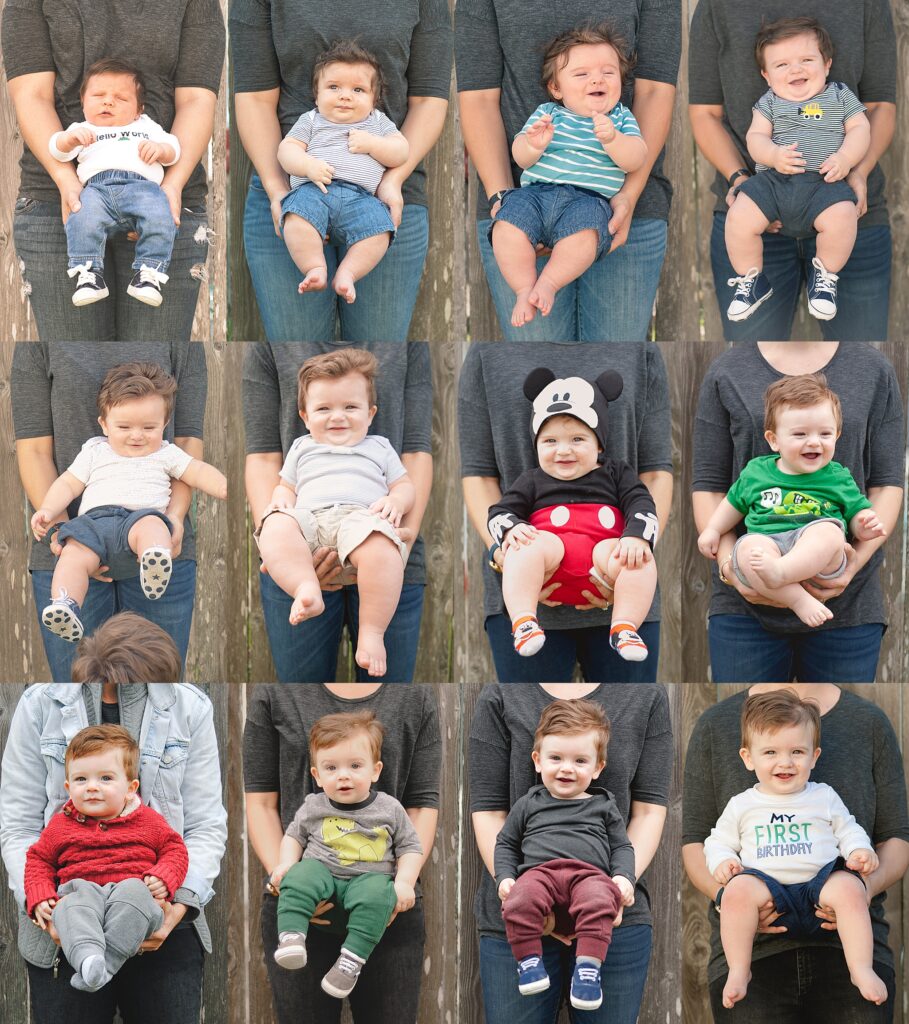
Okay, so let’s walk this out. With all of my children, I did a similar type set up each time where I held my baby in a manageable position while my husband took the photo outdoors. Here’s how it went.
Tip #1 Looking for the best light.
I took these photos outside in the evening time after my husband got off in our backyard. The sun was low enough that there wasn’t harsh light or shadows on the baby’s face. The sun was also behind a house giving us even shade. Now if you have a really trained eye, you can even tell which days are the overcast days and which days were sunnier, but we will leave that for another conversation on another day.
Check.
Tip #2 Overshoot
I kid you not, my husband would get so annoyed with how many sets of photos I deemed acceptable before we finished each session. One session would yield anywhere from 50-100 photos to choose from and then I got to have anywhere from 3-7 photos of different smiles and expressions. I often chose the smiling photo to be the image I put in my 12-month collage, but there are some other cute expressions that I captures that I used to show the variety of my son’s personality.
Check.
Tip #3 Keep it simple
This is where I slightly deviated from the plan. With the way I had my monthly baby photos planned, my husband was a participant in these photo shoots. There were definitely easier things to do than this. I wouldn’t exactly say that this was his favorite thing to have to do every month.
However, other ways I kept it simple were not using props, and picking an easily replicable and neutral backdrop like the fence in my backyard.
These subtle choices take your focus off of things that can distract from the subject of the image and allows you to notice more of the details you want to see. For example, you notice that in the “7-month photo” I put him in the Halloween costume that he wore that year. A simple little momento.
Another subtle detail that I bet not many of you noticed, in the “month 5 photo” the top of my oldest son’s head popped into the bottom of the photo. I made this selection intentionally. I remember at that time in little brother’s life his big brother could really make him laugh. If I had lots of props or a busy background I may not have remembered those little details.
I’ll give myself a check(ish) on that one.
Tip #4 Be Consistent
Again, this one speaks for itself. If you take care of the first 3 tips, then consistency easily follows. Now, were the images taken at the exact same time every month. Honestly, no. Life happens and we all know it. Sometimes I took the photos a day late; sometimes a week late. But, if monthly photos of your nugget are important for you (and I imagine they are since you’ve read this far) then doing all the heavy leg work at the beginning will make it easier on yourself. So, when months 10, 11, and 12 come around you’re less likely to forget, procrastinate, or give up on these photos that you will want to have.
Check.
What are you doing to capture your monthly baby photos in their first year?
Show me what you’re doing. I love gathering new and unique ideas for how to document growing babies in their first year. Again, if you want to make it really easy, I offer Baby’s First Year Packages that can be tailored to you. Convenience? Yes!
-Mel
Mel B Photo


Add a comment
0 Comments